


Installation Guide For Fiberglass Step Cover & Nosing
Installing Fiberglass Step Covers and Fiberglass Nosings
Installation Preparation:
Clean surfaces so they are free from oil, grease, old coverings, rust and adhesives. All foreign substances should be removed. Any painting or refinishing of the surface should be done prior to installation of the step covers. The surface must be structurally sound and dry prior to installation. The fiberglass step cover and nosing is not a weight bearing material. Cracks, worn areas, depressions, holes, etc must be repaired.
A urethane / polyurethane based adhesive /sealant is recommended when installing over wood, concrete or solid steel steps Recommended products include LOCTITE PL Premium or LIQUID NAILS Heavy Duty'. For grated steps see instructions below.
Materials Required:
– Personal Protection Equipment such as Safety Glasses, Dust Mask, Gloves, Ear Protection, Protective Clothing.
– Marking tools such as a marker, pen, pencil
– Shop type Rags
– Drill with appropriate bit carbide bit suggested
– Tape Measure / Ruler
– Sandpaper
– Chalk Line
– Vacuum or Broom & Dust Pan
– Acetone or De-natured Alcohol
– Adhesive / Sealant
– Fasteners (see below)
Fastener Information
*Truss Head or Pan Head Screws Recommended
| SUBSTRATE | FASTENER RECOMMENDED | SCREW SIZE | Drill Bit Required |
|---|---|---|---|
| Wood | Stainless Steel, 1" - 1½" long | #8 | 7/64" diameter |
| Concrete | Masonry Screw with anchor if needed | #10 | 3/16" diameter |
| Steel | Stainless Steel, 1" - 1½" long Self Tapping | ¼" | ⅜" diameter |
General Preparation and Conditioning
1) Materials should be delivered to the job location in original packaging with instructions/warning label intact.
2) The new fiberglass step covers should be stored in flat, level, dry area.
3) The surface must be clean, level, smooth and dry. If you are repainting the surface do it before installing step covers.
4) Product, surface and ambient temperatures must be above what is recommended on the adhesive instructions before installation.
Step Cover Preparation
Lightly scuff the underside of the step cover with sandpaper and cleanup any surface dust by
wiping with denatured alcohol. This is needed to get a proper bond from the adhesive. Follow the manufacturers instructions when applying the adhesive.
Installation over Concrete, Wood or Steel Steps
The manufacture recommends a urethane / polyurethane based adhesive /sealant such as Loctite PL Premium or Liquid Nails heavy duty when installing over wood, concrete or solid steel steps.
Surface Preparations – Concrete Steps
All holes should be filled and patched to insure the step surface is flat and smooth. Use a cement filler to ensure the step is level if it is bowed or the nose is rounded. Use an industrial cleaner to make sure the surface is clean. Remove any soap residue after cleaning and be sure the surface is completely dry.
Wood Steps
Bowed or severely worn areas of the wooden steps should be removed. A flat, smooth, level surface is required before installation. The surface must be cleaned and completely dry prior to installing the fiberglass step covers/nose.
Metal Floors
Remove any rust or paint that is flaking. Steps are to be level and smooth. Clean the surface with an industrial cleaner. The surface must be cleaned and completely dry prior to installing the fiberglass step covers/nose.
Installation Over Wood, Concrete & Steel Steps.
1) Place one step cover on the top step and another on the bottom step. Center both
treads on the steps. Take the chalk line and stretch it from the left side of the top
step to the left side of the bottom step and snap it. This will offer you a placement
guide line for the rest of the covers.
2) Starting at the top step align step cover tightly against step nosing.
3) Using proper drill bit size, drill pilot holes through the panel into the surface. For a uniform
look, all step covers should have the same drill pattern & hole placements. Holes should be
no closer than 2" to the edge of the step cover. Side / Edge holes should be predetermined
and should not exceed a spacing of 24 inches between holes. Sure-Foot recommends a
spacing of 12"-16" on center on highly traveled areas.
4) Remove the tread, using the drill with proper bit size for chosen screw, drill your
pilot holes for the step. Tap each pilot hole if necessary. Clean off any drill shavings
from the step.
5) Follow instructions on adhesive cartridge to ensure best results. Adhesive/Sealant
should be applied to the under-side of the step cover in 1/2" bead around the edge
of the cover, front, back and side approximately 1"-2" from the edge and complete
with a zigzag / serpentine pattern across the bottom of the step covers. Do not apply
adhesive over the pre-drilled holes.
6) Position the step cover against the step nose and carefully align the pre-drilled holes
precisely with the pilot holes. Firmly place the cover with adhesive onto the surface
taking special care to not obstruct the pilot holes or to slide the cover.
7) Insert the appropriate screw and tighten until a proper fit/seal is achieved.
Clean any excess adhesive with denatured alcohol or acetone as recommended by
adhesive /sealant manufacturer
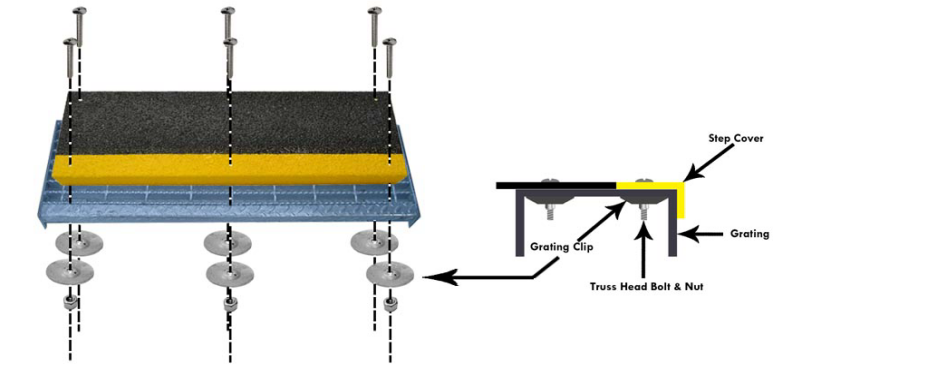
Installation Over Grated Steps
A Grating Clip Kit which includes 2" – ¼" Truss Head Stainless Steel Bolt, Nylon Nut and 2" Galvanized Grating Clip is available. Contact PCI Products Company at (800)869-9633.
1) Place one step cover on the top step and another on the bottom step. Center both
treads on the steps. Take the chalk line and stretch it from the left side of the top
step to the left side of the bottom step and snap it. This will offer you a placement
guide line for the rest of the covers.
2) Starting at the top step align step cover tightly against step nosing.
3) Using 3/8 drill bit, drill pilot holes through the panel through an opening in the grating. For
a uniform look, all step covers should have the same drill pattern & hole placements. Holes
should be no closer than 2 to the edge of the step cover. Side / Edge holes should be
predetermined and should not exceed a spacing of 24 inches between holes. Sure-Foot
recommends a spacing of 12-16 on center on highly traveled areas.
4) Firmly position the step cover against the step nose.
5) Insert the 2-1/4 Phillips head bolt, align round grating clips as shown in above
diagram and fasten nylon nut to bolt. Tighten nut to bolt until a proper fit/seal is
achieved, do not over tighten.
All step covers are made to customer specifications. If additional cutting or trimming is required, we recommend the use of proper Personal Protection Equipment and cut / trim with a high speed diamond blade.
Product Maintenance
Initial Maintenance
Clean and remove any adhesive product from the treads immediately. Wait 72 hours before
using a cleaner or water on the treads.
Regular Maintenance
Remove any loose dirt by sweeping the treads. You can use a general purpose industrial floor cleaner. If dirt is caked on the treads, use a stiff bristled brush with the industrial cleaner or a pressure washer with a maximum pressure (PSI) of 1000 psi.
Please feel free to contact PCI Products Company (www.AbsorbentsOnline.com) with any questions regarding this or any of our additional anti-slip safety products. (800)869-9633
PCI Products Company is not responsible for any injuries or death incurred while installing any of our products.